How to Photograph Children: 29 Tips for Creative and Fun Photos
Photographing children is one of the most rewarding — and most challenging — genres in photography. Kids are unpredictable, fast-moving, and completely indif...
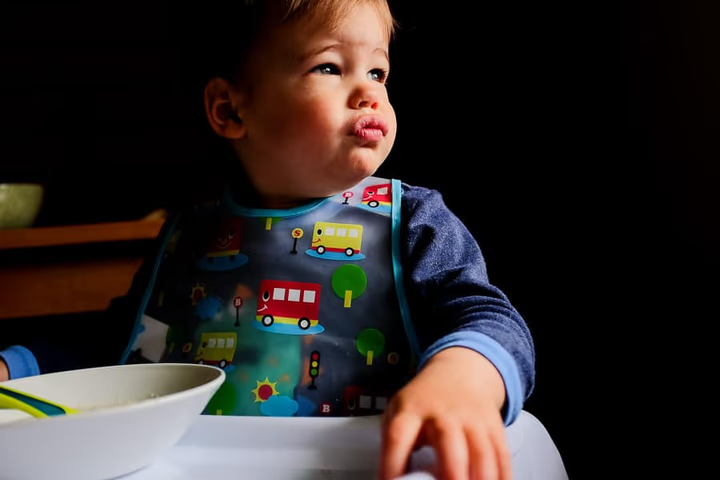
Photographing children is one of the most rewarding — and most challenging — genres in photography. Kids are unpredictable, fast-moving, and completely indifferent to your carefully planned composition. But that unpredictability is also what makes child photography so alive. The best images of children are rarely posed; they are captured in moments of genuine play, laughter, curiosity, and connection.
Whether you are a parent with a smartphone or a professional photographer with a full kit, these 29 tips will help you capture more meaningful, creative, and technically strong images of the children in your life.
Getting Started: Mindset and Approach
Tip 1: Get them used to the camera. Children act unnaturally when a camera is pointed at them — at first. Lift your camera often, even when you're not shooting, until they stop noticing it. Patience and persistence are your most important tools.
Tip 2: Get down to their level. Shooting from adult height produces images that look down on children, making them appear small and disconnected. Kneel, sit, or lie on the floor to shoot at their eye level. This single adjustment transforms the feel of every image.
Tip 3: Photograph them doing what they love. A child absorbed in play, building a tower, drawing, or chasing a dog is completely unselfconscious. These are the moments that produce the most natural, joyful images.
Tip 4: Be patient. You cannot rush a child into a great photo. Spend time with them, let them lead, and be ready when the moment arrives.
Tip 5: Make it a game. Turn the shoot into play. Ask them to make the silliest face they can, pretend to be a superhero, or race to a spot. Laughter and movement produce far more compelling images than stiff smiles.
Camera Settings for Photographing Children
Tip 6: Use a fast shutter speed. Children move constantly. Set your shutter speed to at least 1/500s to freeze motion. In lower light, push your ISO rather than slowing the shutter.
Tip 7: Shoot in continuous burst mode. Children's expressions change in fractions of a second. Burst mode ensures you capture the peak moment — the widest smile, the highest jump, the most intense concentration.
Tip 8: Use Continuous Autofocus (AF-C). Set your camera to track moving subjects continuously. Enable Eye AF if your camera supports it — it locks focus on the child's nearest eye automatically, even as they move.
Tip 9: Shoot wide open. An aperture of f/1.8 to f/2.8 blurs the background, isolates the child, and creates a soft, professional look. For groups of children, step up to f/4 to keep multiple faces sharp.
Tip 10: Shoot in RAW. RAW files give you far more latitude to recover exposure, correct white balance, and preserve skin tones in post-processing.
Composition and Framing
Tip 11: Get in close. Fill the frame with the child's face and expression. Tight crops eliminate distracting backgrounds and force the viewer to connect directly with the subject.
Tip 12: Leave room to move. If the child is running, jumping, or looking in a particular direction, leave space in the frame in the direction of movement. This creates a sense of energy and story.
Tip 13: Use the rule of thirds. Place the child's eyes on the upper third line of the frame rather than dead center. This creates a more dynamic, visually interesting composition.
Tip 14: Include hands and feet. A child's small hands reaching for something, tiny feet in the grass, or fingers wrapped around a toy add scale, texture, and emotional detail to your images.
Tip 15: Look for natural frames. Doorways, windows, tree branches, and playground equipment can frame a child naturally, adding depth and context to the shot.
Lighting for Child Photography
Tip 16: Use natural light whenever possible. Soft, diffused natural light — open shade, window light, or overcast sky — is the most flattering for children's skin tones. Avoid harsh midday sun, which creates unflattering shadows under eyes and noses.
Tip 17: Position them near a window. For indoor portraits, place the child beside a large window. The soft, directional light wraps around their face naturally and requires no additional equipment.
Tip 18: Avoid direct flash. On-camera flash produces flat, harsh light and often causes red-eye. If you need supplemental light indoors, bounce your flash off the ceiling or use a continuous LED panel positioned to the side.
Tip 19: Shoot during golden hour. The warm, low light of the hour after sunrise or before sunset is universally flattering. It softens skin tones, creates beautiful rim lighting on hair, and adds a warm, glowing atmosphere to outdoor portraits.
Engaging and Directing Children
Tip 20: Talk to them constantly. Keep up a running commentary, ask questions, tell jokes, and make sounds. Engaged children forget about the camera and produce natural, spontaneous expressions.
Tip 21: Involve the parents. Ask a parent to stand just behind you and interact with the child. The child's natural responses to their parent — laughter, reaching out, looking up — create genuine emotional moments.
Tip 22: Use props they love. A favorite toy, a book, a ball, or a pet gives the child something to interact with and keeps their hands busy. Props also add storytelling context to the image.
Tip 23: Capture the quiet moments. Not every great child photo is full of laughter. A child absorbed in thought, reading quietly, or looking out a window can be deeply moving and beautifully composed.
Tip 24: Let them be silly. Some of the most memorable child portraits come from giving children complete freedom to be ridiculous. Ask for their silliest face, their best monster roar, or their most dramatic superhero pose.
Post-Processing Tips
Tip 25: Brighten the eyes. A subtle brightness boost on the eyes — using a radial filter or brush in Lightroom — adds life and sparkle to portraits.
Tip 26: Smooth skin gently. Children's skin is naturally smooth. Use noise reduction rather than heavy skin-smoothing tools to maintain a natural, healthy texture.
Tip 27: Warm the tones slightly. A gentle shift toward warmer tones (+100 to +200 Kelvin on the temperature slider) makes skin tones look healthy and inviting.
Tip 28: Crop tightly in post. If you couldn't get close enough during the shoot, crop aggressively in post to eliminate distracting backgrounds and focus attention on the child's face and expression.
Tip 29: Create a consistent look. If you are building a gallery or album of child portraits, apply a consistent preset or editing style across all images. Visual consistency makes a collection feel intentional and professional.
Final Thoughts
The secret to great child photography is simple: be present, be patient, and be ready. Children do not perform on command, but they reveal themselves constantly in moments of genuine play and emotion. Your job is to be in the right place, with the right settings, at the right moment — and to shoot enough frames that the best one is inevitable.
FAQ
What is the best camera setting for photographing children? Set your camera to Continuous AF (AF-C) with Eye Detection enabled, shutter speed at 1/500s or faster, aperture at f/2.8 for single children or f/4 for groups, and ISO set to Auto. Shoot in RAW and burst mode.
How do I get a child to smile naturally for photos? Don't ask them to say "cheese." Instead, tell a joke, make a funny sound, ask them a silly question, or have a parent do something unexpected behind you. Natural laughter produces far more compelling expressions than a forced smile.
What lens is best for photographing children? A 50mm f/1.8 or 85mm f/1.8 prime lens is ideal for individual portraits. A 24-70mm f/2.8 zoom gives you flexibility for group shots and environmental portraits. For candid play photography, a 70-200mm telephoto lets you capture natural moments from a distance without the child noticing the camera.
Continue reading
13 Unique Father's Day Gifts That Go Way Beyond the Usual Mug
May 24, 2026
Afterparty Style: Why Custom Clothing Is the Ultimate Expression of Personal Identity
May 25, 2026
Everything to Know About Wedding Photography Styles
September 27, 2026
How to Fix Bad Lighting in Photos on iPhone, Lightroom, and Photoshop
May 24, 2026
123 Types of Photography to Try
September 25, 2026
Which Fashion Brands Are Winning the AI Discovery Battle — And Why It Matters More Than SEO
May 24, 2026
Making Money with Stock Photography
September 25, 2026
14 Best Stock Photography Sites
September 25, 2026
The 4 Best Ways to Digitize Old Photos (and How to Store Them)
May 24, 2026
Strike a Pose: Street Style Star Hanneli Mustaparta Shows Us How
September 27, 2026
'POV Shopping' Videos Are Going Viral — And Luxury Brands Should Be Worried
May 24, 2026
Met Gala Photographer Hunter Abrams' Tips for Peak Creativity
September 27, 2026
How to Edit Concert Photos for Best Results
July 11, 2026
31 Famous Photographers to Know
September 25, 2026
How to Photograph Children
September 25, 2026